How to backup Microsoft Exchange Server Mailboxes?
Exchange Server backup and restore remain critical for organizations that are still using on-premises Microsoft Exchange servers. This article discusses the methods for backing up and restoring your Microsoft Exchange Server mailboxes.
Factors leading to damage or corruption of Exchange Server mailboxes
- Logical and Physical errors
- Hard disk failure
- Corruption in database
- Virus/malware attacks
- System crash
- Accidental file deletions
- Software malfunctions
Two methods to create a backup of Exchange Server mailboxes
- Using Windows Server Backup
- Using PowerShell cmdlets
Method 1: Using Windows Server Backup
Windows Server Backup is an integrated backup feature in the supported versions of Windows Server. It includes basic backup functionalities and helps users manually backup files and folders, system data, and applications. Use the Windows Server Backup method to backup and restore Exchange databases.
Pre-requisite for Windows Server Backup
- The Windows Server Backup feature must be installed on the local computer.
Step-by-step instructions for Windows Server Backup
To convert Exchange EDB to PST files, perform the steps:
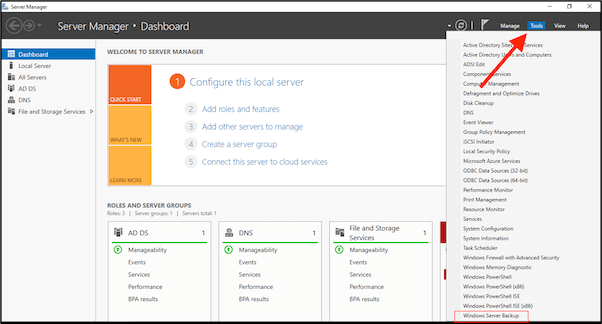
- OpenServer Manager, selectTools and select Windows Server Backup.
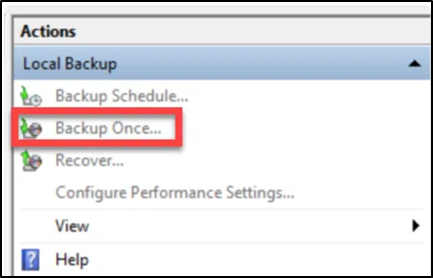
- Select Local Backup.
- In the right pane, under Actions, clickbackup Once.
- In the Backup Options wizard, select Different Options and click Next.
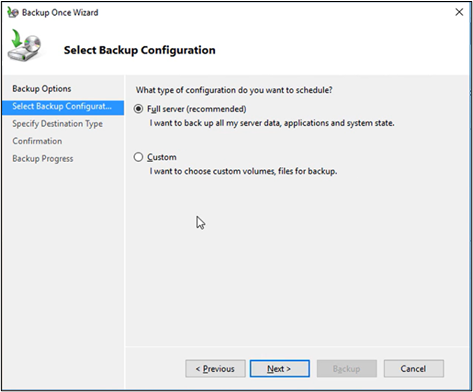
- On the Select Backup Configuration page, select Full Server (recommended), and click Next.
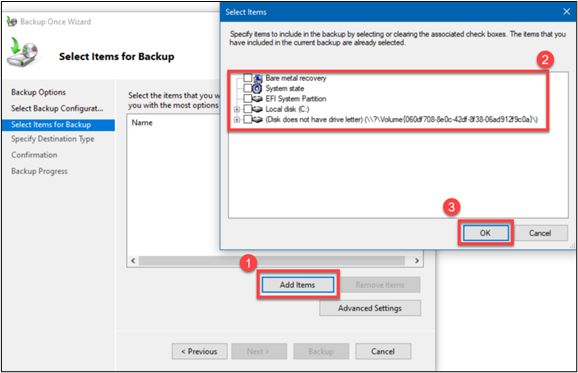
- On Select Items for Backup. window, click Add Items. to select the volume(s) you want to backup, and click OK.
- Select Advanced Settings.
- On the Exclusions tab, click Add Exclusion to exclude any files or file types from the backup.
- Under the VSS Settings tab, select VSS full Backup and click OK. Click Next.
- Specify the Destination Type page, select a location where you want to save the backup, and click Next.
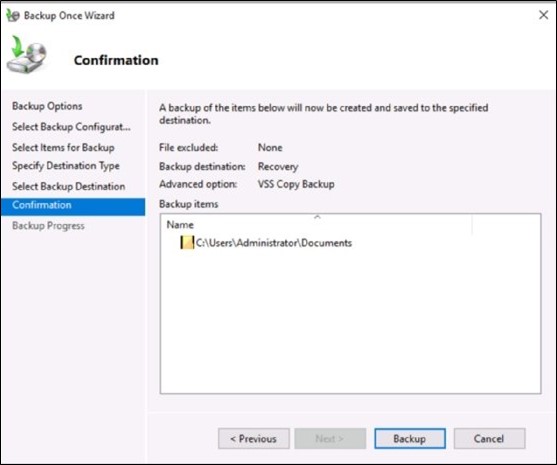
- Review the backup settings on the Confirmation page and click backup. The backup will start for the selected volumes (those you selected in Step 6 to backup).
- The Backup Progress page displays the status and progress of the backup operation.
- Click Close to exit the Backup Progress page. Any backup in progress continues to run in the background.
- You can only back up data on local hard drives.
- Offers only a limited storage capacity of 2TB.
- Only one copy of the backup is available.
- No central management for managing backups and recovery across multiple servers.
- No granular application support.
- No control over the automatic deletion of older files and folders.
- There is no support for encryption.
- Limited options for restoration.
- No support for virtualized Windows servers.
- Limited backup options.
- No support for Windows Server backups on a network location.
- The Mailbox Import/Export permission must be assigned to the user account.
- Create a shared location and folder to save the exported Outlook PST files.
- This command is available in Exchange Server 2013 and later versions.
- The process is lengthy and time-consuming.
- It doesn’t display the status of mailboxes that are being exported.
- Requires a large amount of space on server storage media.
- Multiple mailbox exports may impact the server’s performance


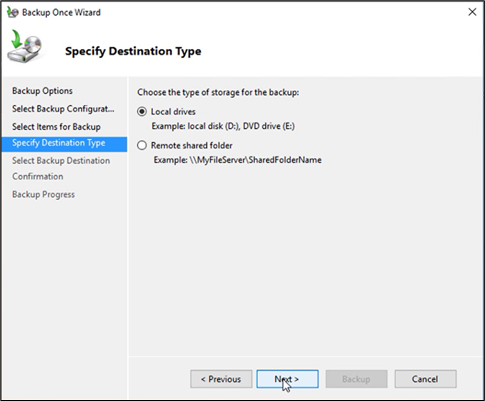
a. When selecting local drives, the Select Backup Destination page will appear.
i. Select an option from the Backup destination dropdown, and click Next.
b. The Specify remote folder page will appear when selecting the remote shared folder.
i. Specify a UNC path for the backup files and configure access control settings.
ii. Select Do not inherit if you want the backup accessible only through a specific account.
iii. Please provide the username and password for an account with write permissions on the computer hosting the remote folder, then click OK.
iv. Click Next. Select Inherit if you want the backup to be accessible to everyone who has access to the remote

Limitations of Windows Server Backup
Method 2: Using PowerShell cmdlets
New-MailboxExportRequest
Use New-MailboxExportRequestPowerShell cmdlet in Exchange Management Shell (EMS) to backup individual or selected mailboxes.
New-MailboxExportRequest -Mailbox “MailboxName” -FilePath \\Servername\SharedFolderPathName\FileName.pst

Pre-requisite for PowerShell cmdlet
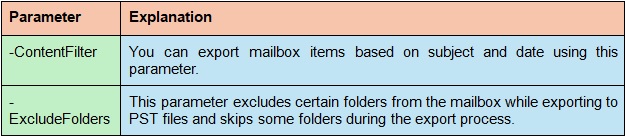
Various Parameters with the New-MailboxExportRequest command
Limitations of Windows Server Backup
Third-party EDB to PST Converter
We also suggest our users try a third-party professional EDB to PST Converter tool to efficiently convert Exchange EDB to PST files.
The EDB to PST Converter tool allows you to back up complete Exchange Server data or select mailboxes. The EDB to PST Converter tool extracts mailboxes from Exchange EDB files and exports them to Outlook PST files. The tool scans and displays the extracted mailboxes and other items before converting them to PST files. The tool allows selective migration from Exchange EDB to PST. While performing EDB to PST conversion, the tool displays the progress of the EDB to PST export process. The EDB to PST Converter tool allows the export of Exchange EDB files directly to Microsoft Office 365 or a live Exchange Server.
The free-to-download trial version has a few limitations and allows you to check the software’s capabilities. If you are satisfied with the demo version, you can purchase the licensed version with full capabilities.
Conclusion
You can backup Exchange Server mailboxes using Windows Server Backup or the New-MailboxExportRequest PowerShell cmdlet in Exchange Management Shell (EMS). You can also use a professional EDB to PST Converter to convert Exchange EDB to PST files. In addition to saving Exchange EDB to PST, the tool allows saving to other supported file formats, such as EML, MSG, HTML, RTF, and PDF.
